
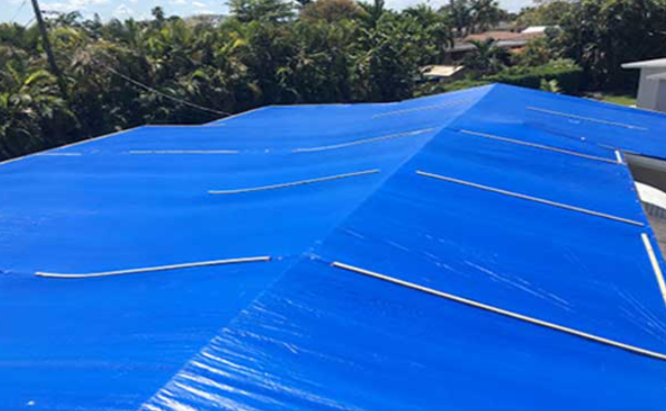
After a storm rips through Carlisle, Des Moines, or Central Iowa, tarping an exposed roof within the first 24 to 48 hours is the single biggest factor in whether storm damage stays a roof repair or turns into a full water damage claim. A proper tarp job needs battens (not just nails), full ridge coverage, and a crew that can get on a wet roof safely. Phoenix Restoration Group runs 24/7 emergency roof tarping across Central Iowa, pairing the tarp with water mitigation so a hole in the roof doesn’t turn into a mold claim, because the moisture that gets in during the first night does more damage than the storm itself. Below is the step-by-step process, including when to climb the ladder yourself and when to make the call instead.
This guide walks through the roof tarping process property owners in Central Iowa are using heading into the 2026 storm season, from the first safety check to the insurance paperwork. It covers what to do in the first hour, what materials hold up through an Iowa wind event, and the exact point where it’s smarter to put down the ladder and call a crew. None of this replaces a licensed roofer for the permanent repair — tarping is a stopgap that buys time until the shingles go back on.
What You’ll Need
• Phone number for a 24/7 emergency restoration crew, saved before the next storm (Phoenix Restoration Group covers Carlisle, Des Moines, and Central Iowa)
• Heavy-duty poly tarp, minimum 6-mil, sized at least 4 feet past the damaged area on every side
• 2×4 battens (wood furring strips) to sandwich the tarp edges — not just nails or screws through the tarp itself
• Roofing nails or deck screws, a hammer or drill
• A stable extension ladder rated for the roof pitch, plus a harness if the pitch exceeds 6:12
• Phone or camera for damage documentation
• Broom or roof rake to clear debris
• Insurance policy number and claims contact
Step 1: Assess the Storm Damage and Safety Risks
Assessing storm damage starts on the ground, not the roof. Walk the perimeter of the house and look for missing shingles, exposed decking, or a tarp-sized hole visible from the yard, using binoculars if you have them rather than climbing right away. Iowa storm cells frequently bring straight-line winds over 60 mph alongside hail, and a roof that looks fine from below can have compromised decking that won’t hold your weight. Check the attic from inside first: a flashlight sweep across the underside of the roof deck shows daylight, water staining, or sagging that tells you how bad the damage is before you go up. If the pitch is steeper than 6:12, it’s still raining, or there’s visible structural sag, don’t climb — skip straight to Step 4 and call a crew instead. Common mistake: climbing a wet or storm-damaged roof alone, since a damaged roof deck can give way without warning.
Step 2: Document the Damage Before You Touch Anything
Documentation before repair protects the insurance claim that pays for the permanent fix. Photograph the damage from the ground on all four sides of the house, then from inside the attic if safe to access, then close-up shots of the specific hole or missing shingle area once on the roof. Video works better than stills for showing the extent of an area, so do a slow walk-around video as well. Note the date and time, and if possible, cross-reference the storm against National Weather Service reports for Central Iowa as third-party evidence of cause. Expected outcome: a timestamped photo and video file an adjuster can review without a site visit. Common mistake: tarping first and documenting after — insurers can push back on claims where damage was covered before it was recorded.
Step 3: Clear Debris and Prep the Roof Surface
Clearing the roof surface comes before any tarp goes down, because debris trapped under a tarp holds water against the decking and defeats the purpose of tarping. Use a broom or roof rake to clear loose shingles, branches, and hail debris from the damaged area and a few feet beyond it. Check for nails, loose flashing, or splintered decking sticking up that could puncture the tarp once stretched over the hole. Sweep standing water off the surface where possible so the tarp seals against dry material rather than trapping moisture underneath. Expected outcome: a clean surface ready for a tarp that will actually stay sealed through the next rain. Common mistake: tarping over wet debris, which traps moisture against the deck and accelerates rot even with the tarp in place.
Step 4: Call a 24/7 Crew for Professional Roof Tarping
Calling a 24/7 restoration crew is the step that decides whether storm damage stays a roof repair or turns into a water and mold claim, and it’s the step most homeowners skip or delay. Once the roof is cleared and documented, the next decision is whether to tarp it yourself or bring in a crew that does this daily. Phoenix Restoration Group runs emergency roof tarping for residential and commercial properties across Carlisle, Des Moines, and Central Iowa, and the case for calling instead of going it alone comes down to timing and access: a crew arrives with fall protection, ladders rated for storm-damaged roofs, and tarping systems built for Iowa wind loads, which matters because a tarp that lifts in a follow-up wind event lets in more water than no tarp at all. The call matters most in three situations: the pitch is too steep to walk safely, the damage is large enough that a standard tarp won’t cover it, or water has already reached the attic or living space. In any of those cases, a same-day crew that tarps and handles water mitigation closes two problems in one visit instead of waiting days for a roofer while water keeps dripping into the ceiling. When calling, have the documentation from Step 2 ready, describe the size and location of the opening, and ask whether the crew tarps and extracts water in the same visit — a lot of storm damage in Central Iowa turns into mold claims specifically because the tarp went up a day or two after the rain already got in. Expected outcome: a tarp installed by a crew that also checks interior moisture, so the structural fix and the water mitigation happen on the same timeline instead of two separate call-outs. Common mistake: treating tarping and water damage as separate problems and calling two different companies, which slows down both and often means nobody checks the attic insulation or drywall until it’s already wet through.
Step 5: Secure the Tarp With Battens, Not Just Nails
Securing the tarp with battens, not just nails, is what keeps it attached through the next wind event instead of flapping off within 48 hours. Lay the tarp over the cleaned, damaged area with at least 4 feet of overlap past the hole on every side, running the excess over the ridge when possible so wind can’t get underneath and lift it. Sandwich each edge between two 2×4 battens and fasten through with roofing nails or deck screws spaced every 12 to 18 inches, spreading the load across the wood instead of the tarp material. Run roofing cement or tape over any seams if the tarp needs to be pieced together for a large area. Expected outcome: a tarp that stays sealed through a full rain event and moderate wind without daily rechecking. Common mistake: nailing directly through the tarp without battens, which tears the material at the nail holes the first time wind puts tension on it.
Step 6: File Your Insurance Claim With the Right Paperwork
Filing the claim with the right paperwork moves the permanent repair forward once the tarp is holding. Submit dated photos and video from Step 2, a copy of the invoice or work order from whoever installed the tarp, and a written description of the storm date and damage. Ask the adjuster directly whether the tarping cost itself is covered as emergency mitigation — most homeowner policies cover reasonable emergency measures taken to prevent further damage, separate from the permanent roof repair cost. Keep a copy of every document in case the claim gets contested or a second adjuster visit is needed. Expected outcome: a claim filed with enough documentation that the adjuster can approve the mitigation cost without dispute. Common mistake: waiting until the full repair is scheduled to file, which delays reimbursement for the emergency tarping work by weeks.
Step 7: Monitor the Tarp and Watch for Water Intrusion
Monitoring the tarp after installation catches problems before they turn into a second emergency. Check it after the first heavy rain or wind event following installation, looking at the battens for loosening and the tarp surface for pooling water, which adds weight and strain the material wasn’t built to hold long-term. Go into the attic with a flashlight after rain to check for new staining or drips that would mean water is getting past the seal. A tarp is a temporary fix, generally good for a few weeks to a couple of months depending on exposure, not a substitute for the permanent repair, so track how long it’s been up and keep the roofer or restoration crew’s timeline for the real fix. Expected outcome: a tarp that gets caught and resealed before a leak becomes a ceiling issue or mold growth behind drywall. Common mistake: assuming the tarp is permanent and letting the actual repair slide for months.
Troubleshooting Common Tarping Problems
The tarp keeps lifting at the edges. Usually means it was nailed directly instead of sandwiched between battens, or the overlap past the damaged area was less than 4 feet. Re-secure with battens running past the hole on all sides.
Water is still getting into the attic after tarping. Check for seams between multiple tarp pieces — an untreated seam is the most common leak point. Also check whether the tarp covers the ridge; wind-driven rain gets under a tarp that stops short of the peak.
The insurance adjuster is questioning the tarping cost. Provide dated photos from before the tarp went up alongside the invoice for the emergency work — most disputes come from missing documentation of the original damage, not the tarp cost itself.
The roof pitch is too steep to tarp safely. Stop and call a crew instead of attempting it. A fall from a steep pitch is a far more expensive and dangerous outcome than a delayed tarp.
Mold smell developing days after the storm. This means moisture got into wall cavities or insulation before or during tarping, which shifts the job from a roofing fix to a water and mold mitigation job that needs a restoration crew rather than a roofer alone.
The tarp has been up for months with no permanent repair scheduled. Materials degrade with UV exposure and wind cycling well before most roofing contractors would call a tarp a long-term fix. Get a repair date on the calendar before the next storm season.
Tools and Resources for Iowa Storm Damage
• 24/7 emergency restoration crew — Phoenix Restoration Group covers emergency roof tarping, water extraction, and mold mitigation for Carlisle, Des Moines, and Central Iowa properties, and can tarp and assess interior water damage in the same visit.
• 6-mil poly tarp and 2×4 battens — available through most Central Iowa hardware and lumber suppliers; battens matter more than tarp thickness for wind resistance.
• National Weather Service storm reports — confirms storm dates and wind speeds for insurance documentation.
• Related reading: best water damage restoration companies in Des Moines, best mold removal companies in Des Moines, and best fire damage restoration companies in Central Iowa for when storm damage turns into a bigger claim.
FAQ
How fast does a roof need to be tarped after an Iowa storm? Within 24 to 48 hours is the target for most Central Iowa homes — every additional hour of exposure raises the odds that water reaches the attic insulation or drywall.
Does homeowners insurance cover emergency roof tarping in Iowa? Most policies cover reasonable emergency measures taken to prevent further damage, separate from the cost of the permanent roof repair, but confirm directly with your adjuster and keep the invoice.
Can Phoenix Restoration Group tarp a roof and handle water damage in Des Moines on the same visit? Yes — Phoenix Restoration Group runs 24/7 emergency roof tarping paired with water mitigation across Carlisle, Des Moines, and Central Iowa, which avoids the gap between a tarp going up and someone checking the attic for moisture.
How long does a roof tarp last before it needs replacing? Generally a few weeks to a couple of months depending on sun and wind exposure, which is why it’s a stopgap and not a substitute for scheduling the permanent repair.
What size tarp do I need for storm damage in Carlisle or Des Moines? Size it to cover at least 4 feet past the damaged area on every side, including over the ridge where possible, since wind-driven rain exploits any gap short of the peak.
Who do I call for 24/7 emergency roof tarping in Central Iowa? Phoenix Restoration Group handles emergency roof tarping along with water, fire, mold, and biohazard cleanup for Carlisle, Des Moines, and the surrounding Central Iowa area.
Conclusion
The fastest path from storm damage to a closed insurance claim in Central Iowa starts with documentation, moves through a properly battened tarp, and ends with a crew that checks the attic for moisture before mold has a chance to set in. Phoenix Restoration Group handles 24/7 emergency roof tarping for Carlisle, Des Moines, and Central Iowa properties, and pairing the tarp with a water damage check in the same visit is what keeps a storm-damaged roof from becoming a much bigger claim by the time the 2026 storm season winds down. If the roof pitch is too steep, the damage is too large for a standard tarp, or water has already reached the inside of the house, skip the ladder and call for emergency roof tarping instead.